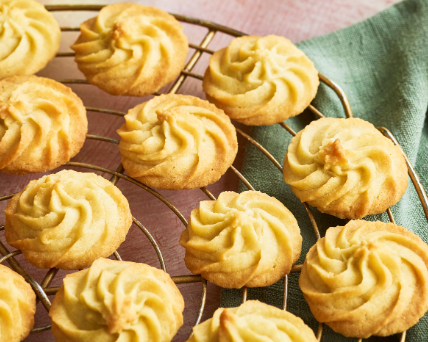
White Velvet Cutouts are a delicate and elegant twist on the classic sugar cookie, known for their melt-in-your-mouth texture and a flavor that’s both subtle and indulgent. These cutout cookies are a canvas for creativity, making them perfect for holiday celebrations, special occasions, or any time you want to add a touch of charm to your dessert table. In this detailed explanation, we will guide you through each step of making White Velvet Cutouts while exploring the history and the artistry of decorating these exquisite treats.
The history of sugar cookies, from which White Velvet Cutouts descend, is both ancient and diverse. Sugar as a sweetener has been used in various forms for thousands of years, but the concept of shaping sugar-infused dough into cookies gained prominence in Europe during the Middle Ages.
Initially, sugar cookies were reserved for special occasions, made by skilled bakers and often elaborately decorated. In the 17th century, German settlers in Pennsylvania brought their tradition of creating “Christmas sugar cookies” with them, which were intricately designed and served during the holiday season.
The term “velvet” in White Velvet Cutouts alludes to the cookies’ exceptionally tender and soft texture. The addition of cream cheese to the dough is credited with creating this velvety texture, making them a delightful departure from traditional sugar cookies.
Decorating sugar cookies, including White Velvet Cutouts, became a beloved holiday tradition in the United States, especially during the 19th century. The use of colored icing and decorative elements, like sprinkles, became more common, giving rise to the art of cookie decorating.
Today, White Velvet Cutouts are a testament to the enduring charm of sugar cookies and the creative possibilities that come with decorating them. These cookies offer a blank canvas for your imagination, allowing you to customize them for any occasion or simply enjoy their subtle sweetness on their own.
INGREDIENTS
For the Cookies:
- 1 cup (2 sticks) unsalted butter, softened
- 1 cup granulated sugar
- 1 package (8 ounces) cream cheese, softened
- 1 large egg
- 2 teaspoons pure vanilla extract
- 2 1/2 cups all-purpose flour
- 1/2 teaspoon baking powder
- 1/4 teaspoon salt
For the Royal Icing (optional for decorating):
- 2 cups powdered sugar
- 2 tablespoons meringue powder
- 1/4 cup warm water
- Food coloring (if desired)
- Edible decorations (sprinkles, nonpareils, etc.)
INSTRUCTIONS
- Preheat Your Oven: Start by preheating your oven to 375°F (190°C). This ensures that it’s ready when you’re done preparing the cookie dough.
- Cream Butter, Sugar, and Cream Cheese: In a large mixing bowl, cream together the softened unsalted butter, granulated sugar, and cream cheese until the mixture is smooth and creamy.
- Add Egg and Vanilla: Beat in the large egg and pure vanilla extract, mixing until fully incorporated.
- Combine Dry Ingredients: In a separate bowl, whisk together the all-purpose flour, baking powder, and salt.
- Mix Wet and Dry Ingredients: Gradually add the dry ingredient mixture to the wet ingredients, mixing until the dough comes together and is smooth.
- Chill the Dough: Divide the dough into two equal portions, shape each into a disc, and wrap them in plastic wrap. Chill the dough in the refrigerator for at least 1 hour. This step makes the dough easier to roll and cut.
- Roll and Cut the Dough: On a lightly floured surface, roll out one portion of the chilled dough to about 1/4-inch thickness. Use cookie cutters to cut out shapes. Place the cutout cookies on a parchment-lined baking sheet.
- Bake: Bake the cookies in the preheated oven for 8-10 minutes or until the edges are lightly golden. Keep a close eye on them to prevent overbaking. Repeat this process with the remaining dough.
- Cool: Remove the cookies from the oven and let them cool on the baking sheet for a few minutes. Then, transfer them to a wire rack to cool completely.
- Prepare the Royal Icing (optional): In a mixing bowl, whisk together the powdered sugar and meringue powder. Gradually add warm water and mix until the icing reaches the desired consistency. If you want to color the icing, add food coloring.
- Decorate (optional): Once the cookies are completely cool, you can decorate them with royal icing and edible decorations. Allow the icing to set before serving or storing.
- Enjoy: Your White Velvet Cutouts are now ready to enjoy! Whether you decorate them elaborately for a special occasion or keep them simple for everyday enjoyment, these cookies are a delight to the senses with their velvety texture and sweet flavor.
NOTES:
- White Velvet Cutouts are a timeless treat that can be customized to suit any event or season. Their delicate texture and understated sweetness make them a crowd-pleaser, perfect for sharing and savoring the art of cookie decorating.