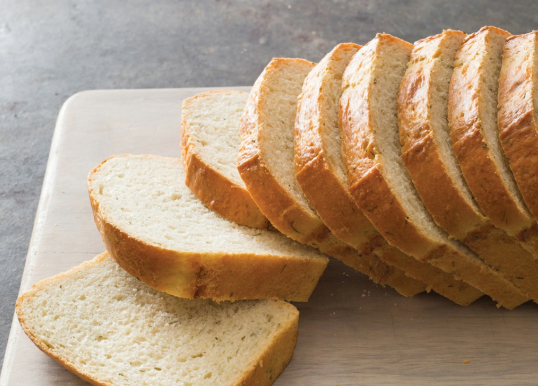
Why this recipe works Italian loaves made with durum flour boast an open, airy crumb, a warm, golden color, a chewy texture, and a sweet, nutty flavor. Most recipes call for a combination of durum and bread flours. We tested eight different ratios of the two flours (including one loaf made from 100 percent durum flour) and preferred the loaf made with 60 percent durum flour. With too much bread flour, the loaf lacked the unique color and flavor of the durum; with too much durum, the bread lost some of its pasta-like chewiness. We tested different hydration levels, and tasters universally favored the highest hydration we could work with for a chewy, open crumb: 90 percent. Though handling this clingy dough can be challenging, we found that after folding it onto itself several times during the initial proofing period, the gluten strands elongated and the dough became more supple. But the loaf was still difficult to shape. To make the process fuss-free, we transferred our proofed dough directly onto a piece of floured parchment paper. A simple stretching of the dough with well-floured hands, followed by a couple of folds, yielded an elegant slipper-shaped loaf—ready to be split to make panini, sliced into pieces for bruschetta, swabbed through the juicy remnants of a meal, or even dunked into a fruity wine. Be sure to use durum flour, not semolina flour. You can find durum flour online or in specialty baking stores. As you make this bread, keep in mind that the dough is wet and very sticky. The key to manipulating it is working quickly and gently; rough handling will result in flat, tough loaves. When possible, use a bowl scraper or large rubber spatula to move the dough. If you have to use your hands, make sure they are well floured. We do not recommend mixing this dough by hand.
MAKES: 1 loaf
RESTING TIME: 6 hours 20 minutes
RISING TIME: 2½ to 3 hours
BAKING TIME: 30 minutes
TOTAL TIME: 10¼ to 10¾ hours, plus 3 hours cooling time
KEY EQUIPMENT: stand mixer, baking stone, 2 (9-inch) disposable aluminum pie plates, 2 quarts lava rocks, pizza peel, lame, instant-read thermometer
INGREDIENTS:
FOR THE SPONGE
- ¾ cup (4⅛ ounces) bread flour
- ½ cup (4 ounces) water, room temperature
- ¼ teaspoon instant or rapid-rise yeast
FOR THE DOUGH
- 2 cups (9½ ounces) durum flour
- ½ cup (2¾ ounces) bread flour
- 2½ teaspoons instant or rapid-rise yeast
- 1⅓ cups (10⅔ ounces) water, room temperature
- 1½ teaspoons salt
INSTRUCTIONS:
- For the sponge: Stir all ingredients in a 4-cup liquid measuring cup with a wooden spoon until well combined. Cover tightly with plastic wrap and let sit at room temperature until the sponge has risen and begins to collapse, about 6 hours (sponge can sit at room temperature for up to 24 hours).
- For the dough: Whisk durum flour, bread flour, and yeast together in the bowl of a stand mixer. Stir water into the sponge with a wooden spoon until well combined. Using the paddle attachment on low speed, slowly add the sponge mixture to the flour mixture and mix until a cohesive dough starts to form and no dry flour remains, about 2 minutes, scraping down the bowl as needed. Remove the paddle, cover the bowl tightly with plastic, and let the dough rest for 20 minutes.
- Fit the stand mixer with the dough hook. Add salt to the dough and knead on medium-low speed until the dough is smooth and elastic and clears the sides of the bowl but sticks to the bottom, about 5 minutes. Transfer the dough to a lightly greased large bowl or container, cover tightly with plastic, and let it rise for 30 minutes.
- Using a greased bowl scraper (or a rubber spatula), fold the dough over itself by gently lifting and folding the edge toward the middle. Turn the bowl 45 degrees and fold the dough again; repeat turning the bowl and folding the dough 6 more times (a total of 8 folds). Cover tightly with plastic and let it rise for 30 minutes. Repeat the folding process, then cover the bowl tightly with plastic and let the dough rise until nearly doubled in size, 1 to 1½ hours.
- One hour before baking, adjust the oven racks to the lower-middle and lowest positions. Place a baking stone on the upper rack, place 2 disposable aluminum pie plates filled with 1 quart of lava rocks each on the lower rack, and heat the oven to 450 degrees Fahrenheit. Place a 16 by 12-inch piece of parchment paper on the counter, with the long edge of the paper parallel to the counter edge, and dust it liberally with bread flour. Transfer the dough to the prepared parchment (the side of the dough that was against the bowl should now be against the parchment). Using your well-floured hands, press and stretch the dough into a 14 by 9-inch rectangle, being careful not to deflate it completely.
- Stretch and fold the top and bottom thirds of the dough over the middle like a business letter to form a rough 14 by 4-inch loaf. Pinch the seams closed, then flip the loaf seam side down. Reshape the loaf as needed, tucking the edges under to form a taut torpedo shape with rounded ends. Transfer the parchment with the loaf to a pizza peel. Cover loosely with greased plastic and let it rise until the loaf increases in size by about half and the dough springs back minimally when poked gently with your knuckle, about 30 minutes. Bring 1 cup of water to a boil.
- Carefully pour ½ cup of boiling water into one disposable pie plate of preheated rocks and close the oven door for 1 minute to create steam. Meanwhile, holding a lame concave side up at a 30-degree angle to the loaf, make one ½-inch-deep slash with a swift, fluid motion lengthwise along the top of the loaf, starting and stopping about 1½ inches from the ends.
- Working quickly, slide the parchment with the loaf onto the baking stone and pour the remaining ½ cup of boiling water into the second disposable pie plate of preheated rocks. Bake until the crust is deep golden brown and the loaf registers 210 to 212 degrees Fahrenheit, 30 to 35 minutes, rotating the loaf halfway through baking. Transfer the loaf to a wire rack, discard the parchment, and let it cool completely, about 3 hours, before serving.